While everybody and their social media consultant is talking about the new Timeline for Facebook Pages I thought I’d be controversial and talk about something else. I’m going to show you how you can get the most out of your Facebook Groups.
Additionally to Facebook Pages Facebook Groups are the other main option Facebook is offering for businesses and brands. Facebook Groups are often overlooked, but can be as powerful as Pages if configured and managed properly. They have some cool features Pages can’t offer; for instance group chat and their own Facebook email address. For companies offering online support Facebook Groups are far superior option than Facebook Pages, or Twitter for that matter.
Three Steps To Customize Your Facebook Group
While the social media world has been preparing for the massive Facebook Pages update lately Facebook Groups have under gone their own updates somewhat unnoticed. They are, however now in very good condition both visually and feature wise to be used in lots of commercial and non-commercial applications. You just need to do a few important customizations and you’re all set. Let me show you what needs to be done.
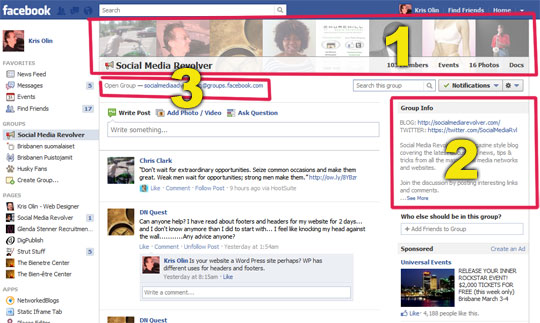
There are three main areas of interest here. First we’re going to replace the image area at the top with a custom banner. Then we’ll sort out the Group Info box and finally we’ll set you up with a custom Facebook URL.
1. Customise Your Facebook Group Banner
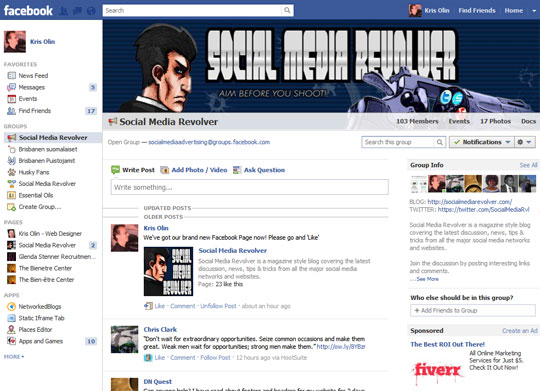
The default mode for the image area in Facebook Groups is to present a flow of pictures from the Group. In most cases this is both impractical and visually unappealing. We’re going to fix that with a cool custom banner.
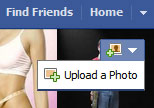
Upload, and click the Save Changes -button.
Your new banner image replaces all those little images that were fed into the picture area originally. Now, isn’t that so much better!
Notice that there is a semi transparent area of 30 pixels at the bottom of the banner, so make sure you don’t put anything important there such as phone numbers, web addresses and so on. Next we’ll have a look what you can do with your Facebook Group Info box.
2. Customize Your Group Info
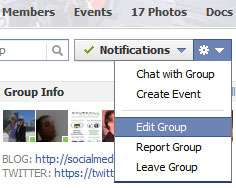
The important thing to remember here is that if you go over those ten lines don’t put your Website, Twitter, blog or any other URL’s in the end as they would not be visible with out clicking the See more -hotlink. I usually put them right at the top.
The other tip is when you write your URL’s make sure you write them including the https:// in front of the www. This way they will become live links that people can actually click on.
3. Get Your Own Facebook Group URL
When you first set up your Facebook Group it will have a very generic URL address with lots of numbers in it. Something like http://www.facebook.com/groups/283445239392807/. Not very nice if you want to print it on your business cards or stationery, yet alone remember! Luckily there is a way to get a custom URL for your Facebook Group instantly right after setup. With Facebook Pages you have to have at least 30 fans in order to get a custom URL but that rule does not apply with Groups. You can get your custom URL straight away if you know how to do it. Let me show you.
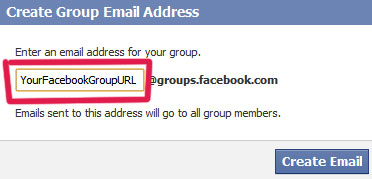
Ok, are you ready for this? [drum roll here] The name you put in front of the @ sign becomes your custom Facebook Group URL!
Once it is accepted it gets locked in and it’s yours! Now, how cool is that? You don’t have to wait for 30 fans to show up or anything! So now, instead of having the awkward https://www.facebook.com/groups/283455239392807/ you can have something like facebook.com/groups/SocialMediaAdvertising. Much easier to remember, print and use don’t you think?
Most importantly as there can be several Facebook Groups with the same (visual) name there can only be one Group with a properly customized name. If your Facebook Group has the name of your business or brand, please make sure that you set up it’s email address and secure the custom Facebook URL.
Ok, there you have the three most important Facebook Group customizations. Do these and you’ll get much more out of your Group. Next week we’ll have a look at what Facebook has done to our beloved Pages. It’s not all good unfortunately. Stay tuned and subscribe to RSS.
Let me know if you are already using or planning to use Facebook Groups in your marketing.
[Recommended reading: EXPOSED! Fake Facebook Accounts Attacking Facebook Groups]
[Image credits – All images and screen prints are from their respective websites and/or social platforms]
Comments are closed.