Every time a website is redesigned or changes made to is permalink structure, a lot of things happen. A lot of URLs are changed and redirects happen. The damping factor as a part of the Google algorithm leads to the loss of PageRank as and when a link passes through a redirect. Hence, you cannot do without fixing such redirects.
Talking of the many redirects that exist, the 301 redirects are created when the intended destination location for the visitors is changed. In instances where the website admin wants to delete a post or a page, they can use a redirect to guide the visitors to the new location or the post. These redirects help the website owner maintain their site’s domain authority and search rankings in case their URL is going to see a change for whatsoever reasons. These are permanent redirects and if they are happening on your website, be informed that a major chunk of the link juice is being passed to the redirected web page. So, 301 redirects are widely used because they ensure that the traffic and PageRank are guaranteed to be kept.
If a lot is going on with your website and it has become a cobweb of redirects, it’s time to launch a fix. Here’s how you can take care of 301 redirects on your WordPress site.
Finding The Redirects
To begin with, you need to find the redirects as they happen. There are several ways and means for you to do so. Chrome extensions like Redirect Path let you find redirect paths for 301s and other error codes, one URL at a time. Other tools such as httpstatus let you easily check for redirect chains. You can check out a maximum of ten redirects, see the full redirect chain with HTTP response headers, response body, and round-trip times. That should do the job of finding redirects for your website.
Once you have figured out how to find redirects on your WordPress site, now is the time to fix the trouble-causing 301 redirects. There are two ways that you can get them fixed; through the use of a plugin and the manual way. If you are a person who has enough expertise on the backend, you can simply take care of your site’s 301 redirects through a process. However, before we go there, let us help you by telling the right way a 301 redirect can be created on your site. Here’s how you do it using the WordPress .htaccess file:
- Decide upon the old as well as the new location of the URL.
- To begin with, you will have to employ an FTP client and connect to your website’s WordPress installation.
- Next up, it is time to locate the .htaccess file for your installation. You will find the .htaccess file in your WordPress site’s root directory. If you are unable to locate the file, be informed that the .htaccess file of a site is hidden and you can use FTP to display the file.
- Now, it is time to edit this .htaccess file. You can simply use a plain text editor or the good old Notepad.
- Now that you have specified the old location and the new location of a URL, you can simply add the redirect code to the end of your .htaccess file.
Here’s an example:
Redirect 301 /old-page-here.html http://www.yournewwebsite.com/new-page-here.html
- At times, the website owner might be in a need to redirect their entire website. Here’s how they can employ the code:
Redirect 301 / http://www.yournewwebsitehere.com
Once you have added the code at the end of the .htaccess file, simply save the file changes, reload the page and you will be done!
Using WP 301 Redirects Plugin
Like we mentioned above, you can also use a plugin to do the hard work for you. The WP 301 Redirects plugin is a great choice for the purpose. It has over 90,000+ active users who love the plugin for helping them control their redirects & regain the traffic.
Here’s how you can use the plugin by a simple installation process:
- Head to WordPress plugin repository and download the plugin.
- Once you have downloaded the contents of the plugin, you will be required to upload the eps-301-redirects folder to the /wp-content/plugins/ directory of your site.
- With the upload finished, you should then move to activate the plugin. Once the plugin is activated, you can begin adding redirects by navigating to your site’s admin dashboard > Settings > 301 Redirects menu item.
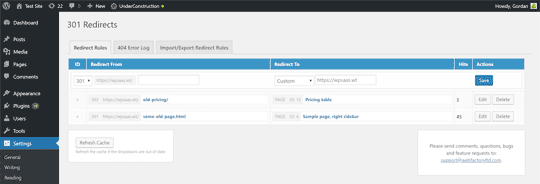
Here’s how the plugin’s admin area looks like. You can start experiencing super-fast redirection by simply adding redirects to this area:
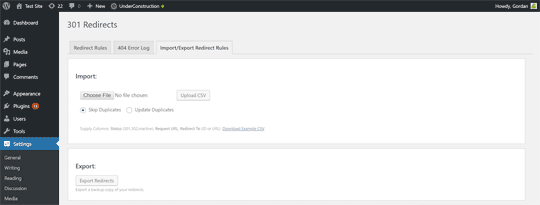
Here’s how the further part of this plugin’s area will appear on your site’s dashboard.
The 301 Redirects plugin easily lets you manage and create 301 & 302 redirects for your WordPress site. It has a user-friendly interface and it also lets you use the Import/Export feature for bulk redirects management.
The other way:
You can also get this done using your functions.php file in your themes directory, or by using a PHP code. Here’s how it is done:
- Begin by figuring out the two URLs: the ‘From’ URL to the ‘To’ URL. This means choosing the URL that needs to be redirected and the one where you intend your visitors to land.
- Now comes the tricky part; matching code strings. Here are either of the two ways you will see that your site’s URLs are ending.
example.com/test-page
example.com/test-page/
- It’s time to create your URL slugs. Here’s an example. If your URL looks like this https://www.xyz.com/05/18/some-page your slug is going to be this /05/18/some-page Remember the slash (/) is important.
- Now, head to your site’s child theme and locate your site’s “functions.php” file. It’s time to add the following code:
function redirect_page() {
if (isset($_SERVER[‘HTTPS’]) &&
($_SERVER[‘HTTPS’] == ‘on’ || $_SERVER[‘HTTPS’] == 1) ||
isset($_SERVER[‘HTTP_X_FORWARDED_PROTO’]) &&
$_SERVER[‘HTTP_X_FORWARDED_PROTO’] == ‘https’) {
$protocol = ‘https://’;
}
else {
$protocol = ‘http://’;
}
$currenturl = $protocol . $_SERVER[‘HTTP_HOST’] . $_SERVER[‘REQUEST_URI’];
$currenturl_relative = wp_make_link_relative($currenturl);
switch ($currenturl_relative) {
case ‘[from slug]’:
$urlto = home_url(‘[to slug]’);
break;
default:
return;
}
if ($currenturl != $urlto)
exit( wp_redirect( $urlto ) );
}
add_action( ‘template_redirect’, ‘redirect_page’ );
The two highlighted sections in the code above are the places where the actions need to be taken i.e.enter your “from” and “to” slugs. Hit the ‘Save’ button and the redirection magic is done!
Conclusion
Based on your convenience, you can easily redirect your users to new URLs so that they do not end up with a ‘404’ or ‘No page found’ error on your site. With the information furnished above, we sincerely hope that revamping your site’s URLs is not going to be an overwhelming task anymore. If you have any further questions about 301 redirects, please feel free to drop your comment/concerns below.
[Images – Main Photo by Pablo García Saldaña on Unsplash; other images from their respective websites and/or social platforms]
Elise is an experienced web developer at WPCodingDev Ltd. and a passionate blogger. She can help you in case you are looking for expert WordPress Developers for customizing your website.


